1. Newton’s Balloon Car
This activity will assist students in learning about engineering design concepts, kinetic energy – the energy that an object has owing to its mobility, and potential energy – the stored energy that an object has due to its position or rather a state, as well as having fun racing them.
Requirements: Balloons, Straws of plastic, Axles made of plastic straws, and wooden skewers, Plastic bottles or cardboard containers that have been emptied, Car wheels made from plastic bottle lids, Glue, and transparent tape.
Steps to be followed:
- Cut the top of the bottle to fit your needs, leaving enough space for the balloon to rest. Leave the bottle’s mouth untouched.
- Cut the plastic straws in half to construct the automobile wheel axles. Attach these straws to the bottle or container’s bottom.
- Tape the bottom of each half of the straw across, one at the front and the other at the back.
- Through the straws, insert the wooden skewers.
- The axles should be longer than the car’s boundaries.
- Make a hole in the middle of the bottle lids to use as the car wheels. Attach the wheels to the skewers’ ends.
- Make a hole in the backside of the bottle, which corresponds to the backside of your car, large enough for a straw to pass through.
- Take a straw and wrap it around a balloon.
- Pass the straw-attached balloon through the two holes you made on the backside of the bottle, as well as the one you made at the start.
- The balloon-powered car is ready to race when you blow the balloon from the other end of the straw!!!
2. Magic of Light Refraction
Overview:
This easy scientific experiment is more of a magic trick that will teach your kids about light refraction.
Requirements:
Glass, Water, a piece of paper, and a Marker
Steps:
- Draw two large arrows on a sheet of paper, one near the top and the other towards the bottom. Make the arrows all point the same way.
- Fill a glass halfway with water. Lower the piece of paper into the glass of water slowly. Take a look through the glass of water and be amazed!
End result:
Refraction is the bending of light when it moves from one medium to another, such as from air to water or from water to air. Light travels from the paper into the air, then through the glass and into the water, and finally out of the glass and back into the air before reaching our eyes in this experiment.
Light moves the fastest through the air, slightly slower via water, and considerably slower through the glass. That is, light bends when it passes through the glass cup and into the water, and then again as it passes through the glass cup and into the air.
3. Dancing Raisins
Overview:
Simple science experiments can be done at home. You’ll only need a few simple items for this simple science experiment that’s excellent for young kids: clear soda, water, and a handful of raisins. With these basic components, you can make chemical reactions that your kids can witness in real-time!
Requirements:
A clear glass of Water, clear Soda, and a hand full of Raisins.
Steps:
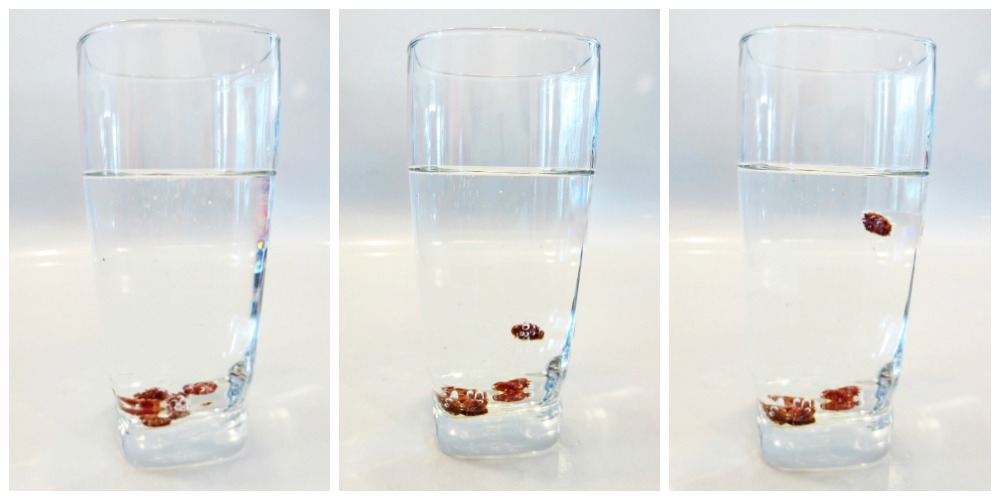
Fill one glass with clear soda and the other with simple water or another drink that does not contain gas bubbles. Then, in each glass, place the raisins and watch how they dance in the clear soda.
The soda’s gas bubbles propel the raisins higher. The raisin dips again after they pop.
End result:
When the carbon dioxide bubbles reach the soda’s surface, they pop, releasing the gas into the atmosphere. As a result, the raisin loses its buoyancy and falls to the bottom of the glass. This is why various liquids react differently to the rising.
4. Mini Volcanos
Overview:
This incredibly simple baking soda and vinegar volcano explosion is a huge hit with kids of all ages, and they’ll be clamoring to do it again and again!
All you’ll need are a few common home items, and your colorful volcano will explode in no time. Preparation takes roughly three minutes.
Requirements:
1tsp of dish soap, 3-4 tbsp of baking soda, 1 cup vinegar, plastic cup, food coloring, and water.
Steps:
- To begin, combine your foundation components by pouring the water into the plastic cup and filling it to about 2/3 capacity.
- After that, mix in the baking soda, dish soap, and a few drops of food coloring or washable paint. You can avoid discoloration by using washable paint instead of food coloring.
- Combine the ingredients and stir well.
- Pour in the vinegar and stir until it foams and pours out of the cup.
- Rep with other colors as needed. Your children will undoubtedly ask for more.
End result:
The “lava” bubbles that erupt are carbon dioxide-filled. When an acid, such as vinegar, combines with a base, such as baking soda, carbon dioxide is produced.
5. Water cycle in a bag
Overview:
This is one of the most accessible science activities for teaching your children about the water cycle.
Requirements:
Water, blue food coloring, clear tape, zip lock bag, and permanent marker.
Steps:
- To begin, draw a sky on the upper side of your ziplock bag with a permanent marker. Include the sun and clouds.
- Fill a cup halfway with water and place a few drops of blue food coloring in it. This will let your children see the water more clearly. Mix it all together until it’s a vibrant blue color.
- Then pour the water into the bag and close it tightly to prevent any water from escaping.
- Now, hang your luggage in a brightly lit window. To keep it from falling, secure it with tape on the corner.
- You can check on your bag in a couple of hours, and then again in roughly a day. Drops of water will ultimately start to stick to the bag’s side. Some will be in the “clouds,” while others will be raining down.
End result:
The sun heats the water in the bag, turning it into a gaseous form through the process of evaporation. This also occurs in our environment. Because the water is trapped in a bag with nowhere to escape, it adheres to the bag’s sides, reverting to a liquid. This is referred to as condensation. This experiment exhibits the ability of the sun to change the state of water.
6. Disappearing Reflection
Overview:
Make your own reflection disappear! Only aluminum foil is required.
Requirements: Scissors, aluminium foil.
Steps:
- Take a large piece of aluminum foil (ten inches should be enough) and look in the mirror. The aluminum foil should then be crumpled. After that, carefully flatten it out again. Finally, look for yourself in the mirror. There’s no sign of it!
End result:
Light reflects off of clean metal foil in straight lines, allowing you to see your own reflection. When you crumple the foil, however, the wrinkled surface scatters your reflection in all directions, causing it to vanish.
7. Jumping Pepper
Overview:
Static electricity will be demonstrated right before your eyes in this simple experiment.
Materials: Hair comb, salt, pepper, plate.
Steps:
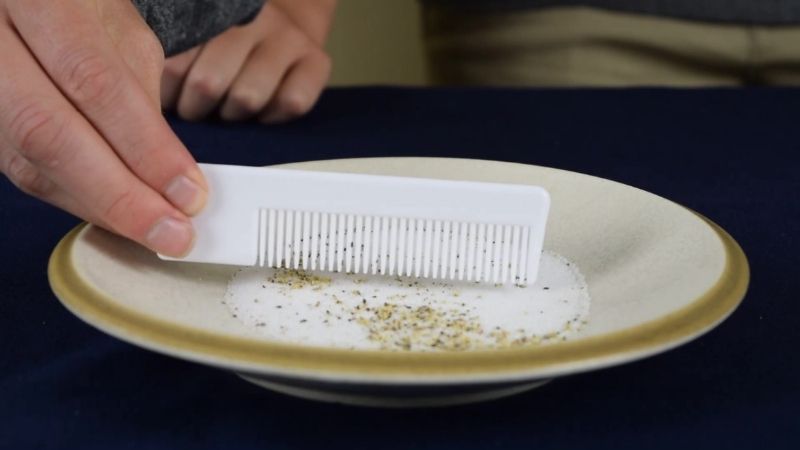
- On a dish, sprinkle a tablespoon of pepper. Then comb your hair using a hair comb. Hold the comb above the dish while still holding it and watch the pepper jump!
End result:
As it travels through your hair, the plastic comb accumulates a negative charge. Because the pepper is positively charged, it jumps!
8. Viscosity experiment using Corn syrup
Overview
This experiment could not be easier, and it’s ideal for teaching viscosity to children of all ages.
Requirements: Corn syrup, food coloring, dropper, cupcake pan or 3 small bowls, 2 glass containers.
Steps:
- Fill the larger glass container halfway or completely with corn syrup. Then, in the center, place the little glass container. Careful! When you do this, the corn syrup will increase somewhat.
- Next, pour a little amount of corn syrup into a cupcake pan or three small bowls. Fill each one with your favorite food dye. There should be three different shades of corn syrup.
- Then, fill the dropper with colored corn syrup, insert it into the clear corn syrup, and drop the coloring in various locations. Do this as many times as you want for each hue.
- You can now rotate the smaller glass jar while keeping the outer glass stationary. The tinted syrup will gradually spread. Switch directions now and return the small glass jar to its original location. The colorful dots instantly return to their original shape.
End Result:
Corn syrup has a viscosity of 5,000 times that of water, thus it doesn’t mix as well.
9. Exploring Surface Tension with Black Pepper
Overview:
Surface tension is a fundamental scientific concept that even young children can grasp. This simple experiment with water, soap, and black pepper will get kids of all ages interested in learning more about this important issue.
Requirements: Water, Liquid soap, A plate or a bowl, and Black pepper.
Steps:
- Fill the plate with a thin layer of water, about an inch deep is plenty.
- Then, liberally sprinkle the pepper over the water, covering as much of the surface as possible. The more pepper, the more enjoyable it is.
- Dip your finger into the liquid soap at the end. See what happens when you touch the pepper!
End result:
The soap is breaking the water’s surface tension! Water molecules (the smallest bits of water) like to stay together, which causes surface tension.
10. Shiny Pennies
Overview:
Pennies are copper, and they’ve been in circulation for a long time, so they’re commonly tarnished. In this experiment, you’ll see if soap, vinegar, or other liquids perform a better job of cleaning the dirty copper penny’s exterior.
Requirements: 2 paper cups, vinegar, dish soap, paper towel, and other liquids from around the house(like ketchup, soda, etc)
Steps:
- Make some educated predictions about which liquid will make the penny shine the brightest.
- Then, in a paper cup, place each penny. Pour enough vinegar into one up to completely cover the dirty penny. Pour enough dish soap into the other cup to completely cover the soiled penny.
- Allow ten minutes to pass.
- Remove the pennies after ten minutes, rinse them with water, then massage them with a paper towel. Compare the coins to determine how clean they are.
- Finally, experiment with various liquids you have on hand.
End result:
Because the copper on the outside reacts with oxygen in the air, pennies become dull with time. Copper and oxygen combine to generate copper oxides, which dull and darken the penny.
The acetic acid in the vinegar dissolves these compounds, restoring the shine to the penny.
Dish soap can be used to clean a variety of surfaces, however, it cannot dissolve copper oxides.
A love for science learning and teaching can bring us all together. A child is curious enough to create wonders, so all we have to do is direct their curious mind to the right way of questioning. Xperimentor science kits that make a science lab at home help your child expand the boundaries of knowledge. We desire to bring science to all. To this end, our blended science learning ecosystem is like the Swiss knife of effective learning. It assists your child in learning at their pace while establishing sound foundational knowledge with tons of fun science experiments, activities, and projects. We believe that experiential learning from our science experiment kits could lead to a generation of scientists and innovators. No wonder kids love it, and teachers across schools approve of it.
Featured Image credits: rbef.org